How 3D Texture Painting Is Made — Step-by-Step Process | SleekyOne
When you look at a stunning piece of 3D texture painting, the first thing that strikes you is the physical depth. The thick, sculpted ridges catch the light, casting soft shadows that make the artwork feel alive.
But how exactly do artists create this three-dimensional effect on a flat canvas?
At SleekyOne, every piece of texture art is meticulously handcrafted by skilled artists in our Dhaka studio. In this behind-the-scenes guide, we will walk you through the fascinating, step-by-step process of how 3D texture painting is made.
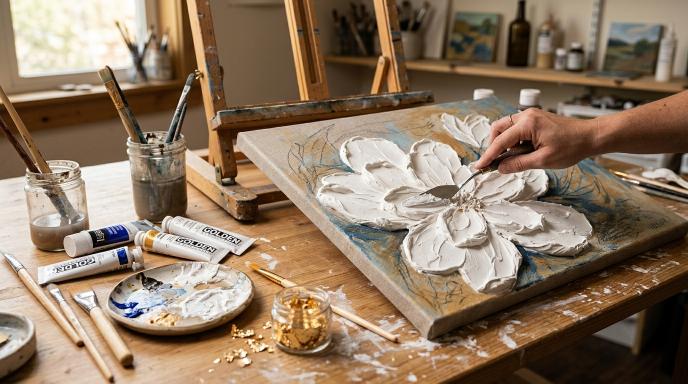
A SleekyOne artist using a palette knife to sculpt a 3D floral design using premium modeling paste.
The Essential Materials
Creating a high-quality texture painting requires specific, professional-grade materials. You cannot achieve this look with standard wall paint. The core materials include:
- Gallery-Wrapped Canvas: A heavy-duty cotton or linen canvas tightly stretched over a wooden frame. It must be strong enough to support the weight of the thick paste.
- Modeling Paste (or Texture Paste): This is the secret ingredient. It is a thick, opaque medium made from marble dust and polymer emulsion. When wet, it feels like thick cake frosting; when dry, it becomes hard and durable.
- Palette Knives: Unlike traditional painting which relies on brushes, texture art is primarily created using metal or plastic palette knives of various shapes and sizes.
- Acrylic Paints: High-pigment acrylic colors used for the base and finishing touches.
- Metallic Leaf (Optional): Thin sheets of gold, silver, or copper leaf used to add luxurious, reflective accents.
- Archival Varnish: A protective sealant applied at the very end.
Step 1: Canvas Preparation and Priming
Before the sculpting begins, the canvas must be prepared. The artist applies a layer of Gesso (a white paint mixture used as a primer). This stiffens the canvas and creates a slightly rough surface, ensuring that the heavy modeling paste will adhere properly without cracking or peeling off later.
Step 2: Sketching the Design
Once the gesso is dry, the artist lightly sketches the design onto the canvas using a pencil or charcoal. Whether it is an abstract geometric pattern or a complex floral arrangement like our SleekyOne-103 Pushpabon, this sketch serves as the roadmap for the sculpting phase.
Step 3: The Sculpting Phase (Applying the Texture)
This is where the magic happens. The artist takes a scoop of modeling paste using a palette knife and applies it to the canvas.
- For Floral Designs: The artist uses a pointed palette knife to carefully drag and shape the paste into individual flower petals, building up thick layers in the center and tapering them at the edges.
- For Abstract Waves: A wider, flat edge knife is used to sweep thick bands of paste across the canvas, creating smooth, rolling crests.
This process requires immense precision and speed, as the paste begins to dry and harden quickly upon exposure to air.
Step 4: The Curing Process
Once the sculpting is complete, patience is required. Because the modeling paste is applied very thickly, a 3D texture painting can take anywhere from 24 to 72 hours to completely dry (or "cure"). If it is painted before the core is fully dry, the sculpture may collapse or crack.
Step 5: Painting and Shading
After the texture is rock-hard, the painting phase begins.
- Base Coat: A base color (often white, cream, or black) is applied over the entire sculpted surface.
- Highlighting and Shading: The artist uses acrylic paints to emphasize the 3D effect. Darker shades are applied into the valleys and crevices to create artificial shadow, while lighter colors are dry-brushed onto the highest peaks to make them pop.
Step 6: Applying Metallic Accents (Gold Leafing)
To give the artwork that signature luxury look, the artist applies a special adhesive (called "size") to specific ridges or edges of the design. Once the adhesive becomes tacky, delicate sheets of metallic gold or silver leaf are gently pressed onto the surface. A soft brush is then used to sweep away the excess, leaving brilliant, light-catching metallic accents.
Step 7: Varnishing and Quality Control
The final step is protection. A coat of UV-resistant, non-yellowing archival varnish is sprayed over the entire canvas. This seals the painting, protecting it from dust, humidity, and fading over time.
After a strict quality control check to ensure the frame is straight and the texture is perfect, the artwork is fitted with heavy-duty hanging hardware and packed securely in SleekyOne's 4-layer shockproof packaging.
Appreciating the Craft
Now that you know how texture painting is made, it is easy to understand why these pieces are so highly valued. They are not mass-produced prints from a machine; they are physical sculptures built on canvas through hours of skilled, manual labor.
When you hang a SleekyOne 3D texture painting in your living room, you are not just hanging decor—you are showcasing authentic, handcrafted artistry.
Interested in seeing how these look in a real room? Message us on WhatsApp to see videos of our artists at work, or to request a free mockup for your own wall!